Thursday, September 10, 2009

Ooodles of Cards

Because I haven't posted in a long time I am doing all in this one post. I don't know where the time has gone. It seems like summer just started and here we are moving into fall and the kids back to school.
White and tangerine tango are the colors. The white layer has been run through the Cuttlebug using the houndstooth folder.
Monochromatic card using close to cocoa and creamy caramel. The large butterfly is stamped on velum with versamark and close to cocoa, then heat embossed and cut out.


This card is basically made using diecuts. I have Cricut Expression and all the flowers, wheelbarrow and leaves were cut out with it. The fence is a Martha Stewart border punch.


My sweet, sassy kitty! This stamp is from Cornish Heritage Farms and is colored using Copics markers.


A one layer card. You stamp the image in the center and use a Nesties to make a mask and sponge or stipple around the edge. Remove mask and you have a frame for your image.


Scrapples are those pieces that are left over from projects. Usually 1.5" x 5". They make great gift tags, small thank you cards, etc.


This card is made using some of the new In Colors from Stampin Up. They are so bold and bright. I love them. Melon Mango, Bermuda Bay and Crushed Curry.


Color challenge and sketch challenge. Old olive, elegant eggplant, black.


This is one of my favorites. The image is a Thomas Kinkaid stamp from Cornish Heritage Farms. I colored with with watercolor crayons and a blender pen. The cardstock of razzleberry and white.


I think that has me pretty well up to date. I won't be making cards today or tomorrow as I go to Calgary to the Tom Baker Cancer Clinic for my twice a year check. God has been so good. I haven't had to have any treatments and I know it is because He is in control.
Have a super weekend and give thanks to God for His mercies!
Blessings,
Faith


Monday, August 10, 2009

Bellacor Red & Gold


I am so thrilled with this card. It came out just like I pictured in my mind, which is a rare occurrence. This was for the Inspiration challenge. We had to visit the Bellacor Vases site and choose one vase that we were inspired by and I chose this one:
Isn't it gorgeous?
The base of the card is black. The next layer is whisper white which I then stamped using versamark ink and the French Flair bg and heat embossed with gold ep. Then I sponged all over with real red until I got the effect I wanted. Cut a strip of black, stamped with versamark and Baroque Motifs stamp and once again heat embossed with gold ep. Used Nestibilities die cuts to make 2 circles. The black I went around the edge with a gold metallic pen. Used the butterfly stamp from Embrace Life, gold embossed, sponged with real red and cut out. Added half pearls and a glue dot to attach to the circle. The circle is on dimensionals. I wish you could see it in real life, it has such a rich, elegant look.
Ingredients:
Stamps: French Flair, Baroque Motif, Embrace Life
Paper: basic black, whisper white
Ink: Versamark, real red
Accessories: heat tool, gold ep, Nestibilities die-cuts, Cuttlebug, dimensionals, sheer red ribbon
Well, I believe I once again am caught up. Hopefully I can keep it that way.
Blessings,
Faith

Sick Riley


Riley is just the cutest little guy, but right now he isn't feeling so good, so hopefully this card will cheer him up. That and a little prayer.
The image is colored with Copic markers and then I added green gel glitter dots to the bedding. The circles were cut out with the coluzzle. Image is on dimensionals, added dewdrops and flower with green rhinestone brad. Do you think this will make him feel better?
Ingredients:
Stamps: Hanna stamps - Riley
Paper: barely banana, certainly celery, whisper white cs, SU designer paper.
Ink: Stazon black
Accessories: Copics markers, MS diamond border punch, Coluzzle circles, gel glitter pen, dewdrops, flower, rhinestone brad, dimensionals

Be Grateful

The Featured Stamper was Teresa Kline (va sunshine) and this is the card I decided to case.
http://www.splitcoaststampers.com/gallery/photo/1325061?&cat=500&ppuser=141637
What am amazing gallery, so much to choose from. I changed the colors, the stamps, and the designer paper.
This card is pretty self-explanatory so I won't go into details. I love the warm fall feel and softness.

Ingredients:
Stamps: Flourishes - Autumn Leaves
Paper: SU chocolate chip, really rust, whisper white. Sprout designer paper
Ink: only orange, really rust
Accessories: SU scallop border punch
SU scallop circle punch, dimensionals, paper flower, brads, sponge

Oven Mitts

Strange title for a card! This was for the Inspiration Challenge 191.
The inspiration came from a selection of aprons, oven mitts and towels. I took mine from an oven mitt that you can find by clicking this link:http://www.heavenlyhostess.com/potholder_sole.html
I made the sunflower with alternating layers of summer sun and brilliant blue cs that was diecut with Nestibilities. Each layer is on dimensionals. Used yellow stickles around the center of the flower. The background is whisper white stamped with Basic Grey Poms in summer sun, pixie pink, really rust and old olive for the leaves. Added a polka dot sheer yellow ribbon. It is bright, colorful, and cheerful.
Ingredients:
Stamps: Basic Grey - Poms
Paper: SU summer sun, brilliant blue, whisper white
Ink: summer sun, pixie pink, really rust, old olive
Accessories: Nestibilities circles, Cuttlebug, yellow stickles, dimensionals, ribbon

Catch up Time Again

Why am I always playing the catch-up game? I must get myself in hand and post as soon as I have finished a card.
This was a fun card to make for the Ways To Use It challenge. We had to use die-cuts and only one stamped image.
Out came the Cricut Expressions and the My World cartridge. I cut out the ship in choc. chip and then the layer for the sails in white. Tore a couple pieces of bashful blue for the ocean waves and put the ship in between the strips. Added some white liquid applique to the wave tops. The base is a piece of SU specialty designer paper, which I absolutely love. The cute whale is from the new Papworks Co. Aqua Amigos set. He is colored with Copics and on dimensionals. Very fun, easy card to make.

Ingredients:
Stamps: Paperworks Co. Aqua Amigos
Paper: bashful blue, whisper white, chocolate chip cs, SU specialty designer paper
Ink: Stazon black, Copics markers
Accessories: Cricut Expressions, My World cartridge, liquid applique, dimensionals, large brad

Saturday, August 1, 2009

Four New Cards

Happy Saturday! Today is the day I get all caught up posting my cards. Yippee!
This card was made for a color challenge, one that I found very difficult to do. We had to use
pretty in pink, really rust, and night of navy. The pink base was run through the Cuttlebug with the divine swirls folder. The navy strip is punched using the SU scallop border punch. The image is on whisper white and really rust that was die-cut with Nestibilities labels. Image is colored with Prismacolor pencils and mineral spirits and popped up on dimensionals. Added some tiny buttons, brads and ribbon. I still am not sure what I think of this.
Ingredients:
Stamps: Rubbernecker
Paper: pretty in pink, night of navy, really rust, white
Ink: Stazon black, night of navy
Accessories: Cuttlebug, divine swirls folder, scallop oval punch, Nestibilities labels, Prismacolor pencils, mineral spirits, paper stub, dimensionals, buttons, ribbon, brads.


Run for the Hills! For the WT227 we had to use doubles of stamps, or embellishments, ribbons, etc. I have had this set for over a year and never used it so decided this was the time to ink it up. First I versamarked the tall pines and heat embossed with green embossing powder.

I made a mask to create the hills and sky. Lots of sponging! The sky is sponged with yoyo yellow, only orange and really rust, the hills are sponged with creamy caramel and green. I used some of the grass blades from Kitties Kits to stamp on the ground. The bear, boot, weiner on a stick and camp fire were all stamped with basic black and colored with watercolor crayons and a blender pen, then cut out and put on dimensionals. Added some birds and sponged with close to cocoa all around the edges of the card. I had great fun making this card.
Ingredients:
Stamps: Stampin' Up Happy Camper, Lovely as a Tree, Kittie Kits: Cause a Scene
Paper: yoyo yellow, whisper white
Ink: basic black, yoyo yellow, only orange, really rust, creamy caramel, green
Accessories: dimensionals, versamark, heat gun, green embossing powder, sponges, dimensionals

CC229 and SC239
The colors are certainly celery, pixie pink,barely
banana. I think this is a wonderful color combo and is one I never would have thought of. Did a little paper piercing with an Ornare template in the corner, added dewdrops and brads. The image is stamped with certainly celery on whisper white using a bamboo background stamp. The flowers are Poms from Basic Grey. A very simple, quick card to make.
Ingredients:
Stamps: Bamboo bg, Basic Grey Poms
Paper: certainly celery, pixie pink, barely banana, whisper white. Doodlebug designer paper
Ink: barely banana, certainly celery, pixie pink
Accessories: dimensionals, ribbon, brads, dewdrops, Ornare piercing template, piercing tool.
IC189 I loved this inspiration challenge. I chose a handbag called Eco Chic as my inspiration.
The base is cream colored Bazzil cardstock stamped with Distress Tea Dye ink using the linen background stamp.
Always artichoke is the base for the image. The image is stamped with always artichoke on very vanilla. I ran a gold metallic around the edges for a little elegance. The picket fence is a Martha Stewart border punch. The butterfly was stamped with the tea dye ink and colored with an always artichoke marker. Diamond stickles added to the butterfly which was then cut out and popped up on a dimensional. Added some half pearls and this gorgeous sheer green ribbon. I think this is one of my favorite cards.
Ingredients:
Stamps: Embrace Life, Linen background
Paper: Bazzil cream, SU very vanilla, always artichoke
Ink: always artichoke, Distress tea dye
Accessories: dimensionals, marker, gold metallic pen, Martha Stewart picket fence border punch, Basic Grey half pearls, ribbon
Now I can go and make my card for the Limited Supplies challenge. Have a wonderful day in the sunshine!
Blessings,
Faith

Friday, July 31, 2009

Pretty Pansies

Another beautiful sun shiny day in Alberta. The best part is that it isn't extremely hot.

This card was made for a sketch challenge 237 and the color challenge 227. Colors we had to use were Lavender Lace, Barely Banana, Going Grey, Basic black and whisper white. Lavender lace is layered on top of barely banana. The center vertical panel is designer paper layered on barely banana cs. The horizontal strip is barely banana stamped with lavender lace and a border of going grey added along the bottom.

The image is stamped with Stazon black and colored with watercolor crayons and a blender pen. The image is layered on barely banana and lavender lace and popped up on dimensionals. Added some dewdrops.

I love the colors on this card, I think they give a very classy, elegant look to it.

Ingredients:
Stamps: Local King Rubber Stamps
Ink: Stazon black, watercolor crayons
Paper: barely banana, lavender lace, going grey, whisper white cs, designer paper
Accessories: Martha Stewart border punch, blender pen, dewdrops, dimensionals

I hope you are enjoying the sunshine.
Blessings,
Faith

Thursday, July 30, 2009

Sympathy

Boy, has it been hot! At least today we have had a break from it. I don't get along with extreme heat so have been like a wrung out dishrag. I really hate to complain because it is so nice to have the sun shining, the flowers and trees blossoming and everything looking so beautiful. This is the time of year that I am in awe of God's beautiful creation.
Along with the good there always comes a little sadness. I made this Sympathy card for my sister-in-law who just lost her father. I am just so thankful that she was home at this time and could be with the family. Donna and my brother are missionaries in Pakistan and were home for a couple of months. They return to Pakistan Aug. 5th.
This card was a real labor of love. All cardstock is from Stampin' Up and the designer paper is from Basic Grey.
The base is elegant eggplant. Orchid opulence was run through the Cuttlebug using the Swiss Dots folder. I used Nestibilities labels for the image. The image was stamped with wasabi green, then used Flower Soft to add texture to the bouquet. Also used dots of Opal Pearl Drops and some purple Stickles to fill in the bouquet. Eucalyptus stickles is on the vase. The strip of designer paper and white cardstock were punched using a Martha Stewart border punch. The sentiment was stamped in elegant eggplant on white and layered on eggplant cardstock. Used the corner rounder punch to soften the look. The sentiment and image are popped up on dimensionals. Added some of those gorgeous Basic Grey half pearls. Absolutely love them! I have to say I am very pleased with how this turned out.
Ingredients:
Stamps: Flourishes - Thinking of You
Papers: Stampin' Up elegant eggplant, orchid opulence, whisper white cardstock, Basic Grey designer paper.
Ink: wasabi green, elegant eggplant
Accessories: Cuttlebug, Swiss Dots folder, Nestibilities Labels, Martha Stewart border punch,
Flower Soft, Opal Pearl Drops, eucalyptus and purple Stickles, dimensionals, Basic Grey half pearls
Enjoy your day.
Blessings,
Faith

Saturday, July 18, 2009

Sage Harmony

My oh my! I have been very lax doing my posting so am way behind. I better pull up my socks and get my rear in gear. lol It is summer time though and often the outside calls so strongly, I just can't ignore it. Also my 11 year old grandson is here every day now that school is out, but that still is not a good enough excuse. He has been spending most of the time in Poppa's shop learning how to make a knife and is doing a super job! He is so excited, can't believe he actually has done this by himself.
This card was made for a sketch challenge. The base is white but the top and bottom sections have been sponged with pretty in pink and sage shadow. The striped panel is a piece of SU designer paper with a piece of pretty in pink cardstock on the top and bottom that I used a Martha Stewart border punch on. On top of that is sage shadow cs and pink dp with a sentiment stamped in sage shadow. The top layer is white on sage shadow and has been stamped several times with pretty in pink. Image is from SU's Happy Harmony.
Added some Basic Grey Opalescence Pearls to finish it. I love these pearls and they come in such beautiful colors.
Ingredients:
Stamps: Happy Harmony
Ink: pretty in pink. sage shadow
Accessories: Basic Grey Opalescent Pearls, Martha Stewart border punch, sponge, dimensionals.
I hope you are having a wonderful, fun filled summer.
Blessings,
Faith

Thursday, July 9, 2009

New Bathroom

This is my new bathroom so lovingly built by my DH. This was the last room to be renovated. Yippee! He has done the whole house, plus finished the basement. What a talented guy!
This is a small old house and this bathroom is very tiny, which makes it very difficult to get decent pictures of it. This one shows the wall color, amber sun, and the accessories are rust and white and chrome.


This shows the beautiful tile and glass tile work around the tub and shower and the new medicine chest.
The next one is the sink and cabinet which he built. This is such a wonderful addition to our little home. You wouldn't believe the amount of work he has done over the years, but when you look around there is such a sense of accomplishment and a job well done.
Thank you my love!!!
Blessings to all,
Faith

Pretty Butterflies


I am continually amazed at the beauty of God's creation. Butterflies are a favorite of mine. They are so light, come in a rainbow of beautiful colors, and I get a sense of softness and gentleness from them. To me they are peace, grace and love.

Today's card is a butterfly extravaganza! Wow, that sounds impressive. :)
The Splitcoast color challenge this week was to use tempting turquoise, baja breeze, apricot appeal, and creamy caramel. I have to admit I was not too sure about this combination to start with but now I love it. The base and butterflies are tempting turquoise, the scalloped circles are baja breeze, the plain circles are apricot appeal and the pierced layer is the closest I good get to creamy caramel. (note to self; order creamy caramel). My daughter Yvonne, diamondangelfish, on Splitcoast, introduced me to the Ornare piercing templates so I just had to use one on this card. And it fit perfectly between the circles. The butterflies are all made using the Martha Stewart butterfly punch. Each butterfly is brushed with diamond stickles and clear rhinestones added to the body. Opal pearl drops have been dotted on the scalloped circle edges. Tiny blue rhinestones are added to the center dot of each piercing. I love the sparkle and simplicity of this card. Now for the ingredients.
Ingredients:
Paper: tempting turquoise, baja breeze, apricot appeal, creamy caramel
Ink: none
Accessories: Martha Stewart butterfly punch, SU circle and scalloped circle punch, diamond Stickles, opal Pearl drops, clear and blue self-adhesive rhinestones, dimensionals, Ornare piercing template, piercing tool
Blessings,
Faith

Friday, July 3, 2009

Holidays are Over!

Hello everyone! Yes, I am back after having a wonderful time attending my Nephew's wedding in Kelowna and visiting family and friends in Victoria. Went to Bellingham where my DH went wild in the Grizzly tool shop. We came home with our van loaded with tools! He is one happy camper.
God richly blessed us with great weather and a safe trip. We are so thankful!

The Newlyweds

Beautiful Victoria All gussied up


This is the card I made for the wedding. House Mouse to the rescue!! Aren't they adorable? The base is purely pomegranate, then whisper white that has been put through the Cuttlebug using the Swiss Dots folder. I die cut whisper white using Nestibilities Labels in two different sizes. The top one is sponged around the edges with purely pomegranate and the image was stamped with Stazon black and the colored with SU watercolor crayons and a blender pen. These were put on dimensionals. The ribbon is purely pomegranate run through a Pretties ribbon slide. The flowers and brads also are from the SU Pretties set. I sponged some purely pomegranate on the white flowers and attached with the clear rhinestone brads. The sentiment is from the Anniversary Birds set by Verve Stamps. This also is on dimensionals. I am very happy with the way this turned out.

Ingredients:
Stamps: House Mouse
Verve - Anniversary Birds
Paper: Whisper white, Purely pomegranate
Ink: Stazon black, Purely pomegranate
Accessories: SU watercolor crayons, blender pen, Cuttlebug, Swiss Dots folder, Nestibilities Labels, dimensionals, SU Pretties flowers and rhinestone brads and ribbon slide. sponge.

Enjoy Gods' Creation and have a wonderful day.
Blessings,
Faith


Tuesday, June 16, 2009

Inspiration

No more complaining from me about the cold weather. It is hot!! This will most likely be my last post for a couple of weeks because we leave on Thursday to attend a wedding and have a bit of a holiday. We will be back the end of June. Tomorrow will be that fun thing called 'packing'.

I am so excited though, our bathroom is completed and I love it. My DH nearly did himself in on this one. We both agree that this is the last project, now he will just do his fun stuff making knives and walking sticks. When I get back I will post some pictures so you can see what a talented guy he is.

IC184
I had so much fun making this card. We had to go to the Lovely Package website and choose an inspiration piece and I chose this package .http://lovelypackage.com/category/confectionery/

Chocolates!! Yummy!! To try and replicate it I went a little wild but I love it for its uniqueness. The base is basic black. Riot of Petals is stamped using Versamark, on whisper white cardstock and then heat embossed with silver embossing powder. Then using a sponge dauber I started working in the four colors I chose. Kiwi Kiss, Only Orange, Real Red and Elegant Eggplant, Basic Black. Once that was done a stamped a small section of the stamp and did the same process, then punched it out with the SU circle scallop punch. Also punched one in whisper white so I could do the spotlight technique. This was put on dimensionals. Added pearls and a sheer varigated ribbon.

Ingredients: Basic black, whisper white cardstock, Versamark ink, silver embossing powder, heat tool, basic black, kiwi kiss, only orange, real red and elegant eggplant ink, sponge dauber, dimensionals, Basic Grey Opaline pearls, variegated sheer ribbon.

I pray that everyone will have a beautiful time over the next two weeks and I will be back to bug everyone once again.

Blessings to all,

Faith

Thursday, June 11, 2009

Wedding Explosion Box

THE SUN IS SHINING!!! This year in Alberta that is something to get excited about. Right now it is gorgeous out and everything looks so bright and happy.

This time next week we will be on our way to Kelowna, BC to attend my nephew's wedding on June 20th. With help from his sister I found out the colors and got some recent pictures and started to make my box. I had one partly made and decided it wasn't turning out so started all over from scratch. This one I am happy with.I used white embossed (with hearts) cardstock for all the compenents of the box. Used my Cricut Expressions to cut out the designer paper to make star flowers which then were centered with self-adhesive pearls.


The above picture shows the lid looking down on it. I stuck a piece of styrofoam in the center of the lid and started to add flowers to it. There are 50 small ribbon roses stuck on the sides of the styrofoam and then 8 larger roses and the white flowers with fancy pearl stems. I also made a few stems using sweetpea Flower Soft and added them. I used the Martha Stewart butterfly punch to make butterflies out of some of the designer paper. Tiny pink rhinestones are attached to each butterfly. Small crystal hearts are on each corner. The sides of the lid I used pink glitter cardstock that was punched on both edges with Martha Stewart diamond border punch. Then adhered a pink ribbon rose to the centre.


Above is the inside of the box which when opened up displays 2 layers of 4 pockets in each layer. I used a circle punch to make an opening at the top of each pocket and then used a scallop circle punch for the black accent. On each piece of designer paper there is a piece of white glitter cardstock that has been cut out with the Cricut. Added a pink sheer knotted ribbon to each pocket. The picture in the center is from their wedding invitation. The bottom layer of pockets had different designer paper and wedding rubons. The corners that fold in are 2 different designer papers attached to the cardstock.

Inside each pocket is a card cut out of pink cardstock that has a piece of the lighter designer paper attached and then on top of that there is a picture. There is a different picture in each pocket with one pocket having all of the info regarding their wedding. At the top of each card I attached a jewelled butterfly that makes a great pull out.

To make one of these boxes you would need the templates of which there are four. One for the box, one for the lid, and two for the pockets. This is a project that takes several hours to make but is well worth the time and effort.

Ingredients: templates, 4, 12x12 white embossed sheets of cardstock, 1 small sheet of pink glitter cs, 1 small piece of white glitter cs, 3, 12x12 designer paper, sticky tape, Scorepal, 1 small sheet of black cs, small ribbon roses, medium ribbon roses, white wedding flowers, crystal hearts, pearls, jewelled butterflies, rubons, Cricut Expressions, Martha Stewart diamond border punch, SU circle punch, SU scallop circle punch

I must give a special word of thanks to Loretta (lorettal) for teaching me how to make these.
I have learned so much from Loretta, she is a very special friend.

Happy Stamping!

Faith


Sunday, June 7, 2009

Bugs

I hope everyone is having a blessed Sunday! I know the sun is shining somewhere, but I definitely know the Son is shining here.
Yesterday on Splitcoast Steffi had a beautiful inspiration challenge for us. We had to go to the Dazzle Design set and choose from the many beautiful items for our inspiration. The first one I chose was a boy's room with bugs and the second one was a bedding set with Lady bugs. I must have been on some kind of bug juice. :) Anyway the first one did not come up to my expectations but surprisingly enough some people thought it was great. The second one I am much happier with. Here are all the particulars.

IC183

The base is real red. The whisper white has been run through the Cuttlebug using the Swiss Dot folder and a flower edge folder. Then it was punched with the scallop border punch. The images were stamped on whisper white with Stazon black and heat set then colored with Copics. I cut them out and layered on real red squares popped up on dimensionals. The final touch was adding self-adhesive red rhinestones to the flower border. I think it makes a happy, bright, touch of summer card.

Ingredients: Real Red and Whisper white cardstock, Cuttlebug and folders, Copics markers, dimensionals, scallop border punch, self-adhesive red rhinestones.

IC183

First of all I made a magnifying glass by stamping the image in brilliant blue on vellum, then using the Coluzzle I cut the vellum in a circle and cut a piece of the white cs to use as backing, then a circle of only orange to make the rim of the glass. The vellum is turned face down and all layers adhered together. Made my own handle out of choc. chip cardstock. All of this was put on dimensionals. Added a few orange dewdrops and Basic Grey letters to spell the word Bugs. Used the corner rounder punch on three corners.

Ingredients: Basic Grey Dragonfly stamp set, Basic Grey self-adhesive letters, brilliant blue, only orange and whisper white cardstock, vellum, brilliant blue ink, circle Coluzzle, corner rounder punch, dewdrops, dimensionals

Friday, June 5, 2009

Riding Kiwi Tango

Would you believe my furnace is running!!?? It is downright cold today. I am sure we will have frost tonight. Some areas actually had some snow today. I am beginning to think we aren't going to get much warm weather this year. Oh well, it is all according to God's plan, so give thanks.
This card was made for two challenges. I really like to combine the sketch challenge and the color challenge whenever I can. The color challenge is Kiwi Kiss, Riding Hood Red and Tango Tangerine. This is the first card I have made using these colors that I really like. I finally am getting the hang of things and they will be gone in another month.


SC231 & CC221

The base is Kiwi Kiss. The two layers of cardstock for the panels are Riding Hood Red and Tango Tangerine. I stamped Riot of Petals background stamp with Versamark on whisper white cardstock and then heat embossed it with Copper embossing powder. Then, using a sponge I sponged all over white with the three challenge colors. Once I finished sponging I cut three strips and put them on the three panels. Wrapped the card with Tango Tangerine ribbon, made a bow and added a charm. Simple, simple, simple, but really like it.

Ingredients: Stampin'Up Riot of Petals background stamp, Versamark, SU Copper embossing powder, Kiwi Kiss, Riding Hood Red, Tango Tangerine cardstock and ink, sponge, heat tool, SU Tango Tangerine ribbon, silver charm. I just realized all supplies were Stampin'Up, except for the charm.

Hope it is warm wherever you are. If not, then soak in the warmth of God's love.

Happy Stamping!

Faith

Wednesday, June 3, 2009

Anniversary

You know the harder I try to get ahead, the further behind I seem to get. lol I made this card a week ago and only now am getting it posted. Sheeesh!! I made this for dear friends for their 32nd Anniversary.

Talk about simple, this one goes to the top of the list. If you are in a hurry this is the baby to make. The base is basic black topped by whisper white. Anniversary Birds and sentiment were stamped with Versamark and heat embossed with white embossing powder. Used the corner rounder punch of the corners, put them on dimensionals, added the flowers and dewdrops.

Voila!! It is a done deed.

Ingredients: Anniversary Birds set from Verve Stamps, basic black and whisper white cardstock, Versamark ink, white embossing powder, heat tool, corner rounder punch, dimensionals, dewdrops by Robins Nest, Persimmon Daisy Dreams by Prima Flowers

Have a wonderful evening and enjoy God's wonderful creation. Happy Stamping!

Blessings, Faith

Saturday, May 30, 2009

Masculine Birthday

Today has been a busy day. Just got back from Calgary where I attended an Epicure Spice party hosted by my daughter Lynn. My daughter Shawna, has just become a demonstrator and this was her first party. It was a roaring success so everyone left happy.

For those who may not know, Epicure Spices is a Canadian company that has a whole line of the most amazing spices, dips, salsas, etc., that are all natural ingredients. They are so yummy!! This card was made for a friend's birthday. I am really pleased with how this came out and it was very simple to make. The image was stamped on whisper white with black ink and colored with watercolor crayons and a blender. I used Shimmerz for the light coming off the lighthouse. The ovals were cut with the coluzzle and the sentiment was stamped with really rust, trimmed with the paper cutter and the ends snipped with the corner rounder punch. Added some brads to complete the picture. I think it is the colors that give it that masculine feel. Both the brown and rust cardstock are textured and from Bazzill. The designer paper is Basic Grey.

Ingredients: Our Daily Bread 'Let Your Light Shine' stamp set, sentiment from Stampin' up Birthday Whimsey, Bazzill brown and rust textured cardstock, Basic Grey designer paper, oval coluzzle, corner rounder punch, watercolor crayons, blender pen, Shimmerz gold, dimensionals.

It is late, I am tired, so will say goodnight. Hope you all have a restful night.
Happy stamping!

Faith


Friday, May 29, 2009

Sweet Giraffe

My goodness, it has been a while since I last posted. We have had gorgeous weather this last week and I have taken advantage of it to get all of my hanging baskets, barrels, and containers planted. Every day I can see growth happening. I just love this time of the year. I am a real lover of flowers so I have them everywhere in my yard.
God has been answering prayer. A dear friend has been very ill and finally had the surgery she needed and Praise God, is doing well.

SC230 & CC220

This little guy is from Imaginisce Snag 'em Stamps and was perfect size for the sketch challenge and for a birthday card for a little boy who is turning 2. The color challenge was to use so saffron, bashful blue, and pumpkin pie. The bottom layer is bashful blue, followed by a strip of so saffron that was punched with the diamond border punch from Martha Stewart. The third layer is pumpkin pie cardstock topped with designer paper from Stampin' Up and Basic Grey. Fourth layer is pumpkin pie once again punched with the border punch and 2 buttons and 2 star rhinestones added. The last layer is bashful blue and whisper white used for the image and sentiment. The image was colored with Copic markers and the sentiment was stamped with pumpkin pie ink and the edges sponged with the same. I used an Ornare piercing template in the right hand corner. I had fun with this one. Hope you enjoy it too.

Ingredients: Snag 'em Stamps Giraffe, Stampin' Up sentiment, black and pumpkin pie ink, bashful blue, so saffron, pumpkin pie, and whisper white cardstock. Basic Grey and Stampin' Up designer paper, Copic markers, Martha Steward diamond border punch, corner rounder punch, Ornare piercing template and piercing tool, buttons, rhinestone stars, dimensionals

Thursday, May 21, 2009

By the Sea

I am keeping my fingers crossed that we have seen the last of the cold weather. It was beautiful on Saturday, went out and bought all the bedding plants and it turned cold again. In fact it snowed all day on Monday. Good grief, it's May!
Hopefully this beach card will bring a touch of summer or at least the promise of summer. Oh to be sitting on the beach by the ocean.

The stamps used on this card are from Crafty Secrets and the set is called seaside. Love this set, there are so many ways to use it. This card has only two colors of cardstock, so saffron and whisper white. The base is stamped with the SU weathered background stamp and then stamped with the various seashells from the set, all in creamy caramel. I used Nestibilities scallop ovals for the image and scallop circle punch for the sentiment and sponged the edges with creamy caramel. The image is colored with watercolor crayons and a blender pen. Both are popped up on dimensionals. Added a bit of twine and a button seagull. In a month I will be on my way out to BC and the ocean. It will be heaven. God's creation is so awesome.

Keep smiling and happy stamping!

Faith

Thursday, May 14, 2009

Blog Award

I think I still am in shock. Somebody, pinch me! I have never received an Award like this before. I truly am honored and humbled to have been given this award by my special friend Loretta Lock. Thank you Loretta for this very undeserving award. The Lord is the light of my life and I just want everyone to share in the light.


Here are the details about this award:


"The Exalting Christ Blog Award" is given to bloggers who consistently exalt the name of Christ on their blogs. What a joy to see crafters blend their passion for Christ and paper crafting. This award is given to bloggers who share Christ through their posts or through the design of their artwork. We are commanded in Scripture to be 'salt and light' sharing the Good News of Jesus no matter where we are (Matthew 5:13-16). This award is just a way members of Women to Women: Sharing Jesus can say thanks for exalting Christ with us!


Rules:


1. Post the blog award in a regular post on your blog with the explanation, including the original link to WTW and the rules for passing the award along
2. Name five people (more or less) to whom you want to offer this award and link to their blogs. The blogs need to obviously exalt Christ in some manner.
3. Contact the bloggers you have named to let them know they can pick up their blog award from you.
4. Invite them to permanently display the WTW blog badge and/or the award on their blogs. The badge can be obtained on the WTW site.


"I am thrilled to pass this award on to the following dear sisters in Christ:


Judy http://jarfullofjoy.blogspot.com/


Amy http://picklepaperdesigns.blogspot.com

Patter http://triplethescraps.blogspot.com

Continue to uplift the name of the Lord and you will be blessed.


Wednesday, May 13, 2009

Make Music

We don't always have to make a loud noise to the Lord. Scripture tells us to sing and make music in our hearts. Doing that keeps us in His presence and worship is uplifting to our souls. This is why I so love the Our Daily Bread Design stamps. They profess our faith and witness to the saving grace of our Lord and Savior. This card is made for the ODBD sketch challenge using the set 'Sing to the Lord'.

ODBDSC03

Sage shadow and blush blossom are two of my favorite colors. I find them to be very soft and peaceful so I felt they were appropriate for this verse. Singing and making music in our hearts fills us with joy and peace.

Sage shadow is the base and has been stamped with sage shadow ink using the Pretty Petals background stamp. Then used the Scorepal to score diagonally across the paper. A square of SU designer paper is layered on blush blossom and the corners have been punched with the corner rounder punch. The verse is stamped on whisper white with real red ink and layered on blush blossom that has been punched on both edges with the scallop border punch. I used the Coluzzle to make the ovals for the image and the image is colored with watercolor crayons and a blender pen. The verse and flowers are on dimensionals. Added some pearl dewdrops and a bow. This card makes me feel good and I know it is because my mind and heart have been centered on Jesus all the time.

Blessings to all and Happy Stamping!

Moving On!

I am trying to get caught up on the posting of my cards, one more to go after this.

HM#37, CC218

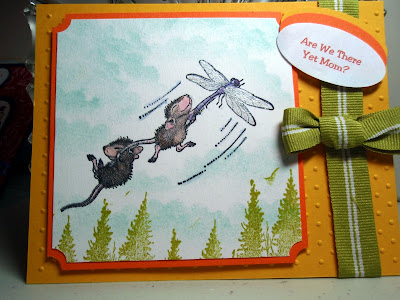
I am sure you have guessed by now that I am a huge House Mouse fan. This was done to cover the House Mouse weekly challenge to do with moving. Also the color challenge to use summer sun, only orange and kiwi kiss. The base, summer sun was embossed with the Swiss Dots Cuttlebug folder. The image, called Dragonfly-ing, was stamped with Stazon black on whisper white cs. Coloring was done using watercolor crayons and a blender pen. Sponged some clouds for a sky background and stamped trees along the bottom in kiwi kiss. Wanted to have the effect of flying over the treetops, moving on to a new home. The wings on the dragonfly were colored and then brushed with Lumiere acrylic paint for a bit of shimmer. Made my own sentiment on the computer. Added kiwi kiss ribbon. The corners on the image panel were punched with the ticket punch.

Ingredients: House Mouse 'Dragonfly-ing' stamp, Cuttlebug and Swiss Dots folder, oval punch, ticket punch, watercolor crayons, blender pen, Stazon black ink, soft sky ink, kiwi kiss ink, dimensionals, Lumiere acrylic paint, kiwi kiss ribbon.

Have a super evening. Blessings!

Cowboy Riley

This is the day the Lord has made, be glad and rejoice in it! I have found that on the really tough days the more praise you give to God, the better the day gets. I know we all have those days. Isn't great to know we are never alone, our Savior walks alongside us, at times He carries us. Just had to share that thought.


TLC220

Isn't Riley the cutest, rootinest, cowboy you ever saw? Riley is put out by Hanna Stamps. Mondays technique challenge was to use the Bandana technique which to me just shouted out "Cowboy"! This is the first time I have used this technique and really wasn't too sure what I was doing so I really must try this again.

The base is night of navy, topped by real red which has been stamped in night of navy using the Stitches background stamp. Then you take a white gel pen and kind of follow along the lines to get that bandana effect. You might have to use your imagination here because like I said I need to practice. Riley was stamped with stazon black on whisper white cs and colored with Copics markers and a silver glitter gel pen for his buckle and arrow. Found a scrap piece of Boho SU designer paper, put it vertically and then added two parallel blue ribbons and a red ribbon on top. Added two red ribbon knots. I didn't have a stamp that had a suitable sentiment so I went to my trusty computer and made my own. The sentiment and image are on dimensionals. Added the blue star eyelets to complete the picture. This was a fun one to do.

Keep on praising and happy stamping!

Tuesday, May 12, 2009

Bonjour

I am so far behind in posting my cards, so will try to get caught up today. This card was made for Saturday's Inspiration challenge. We had to go to the website called Bonjour Mon Coussin. They make pillows, and we were to pick one as our inspiration and I picked this one:
http://www.bonjourmoncoussin.com/en/index.php?act=1,1,31

I am really happy with how this turned out. I wanted it to look like a quilted collage of flowers like the pillow. There was a lot of work involved but I enjoyed every minute of it.


The base is Kraft cardstock. I stamped four images on whisper white and colored them with watercolor crayons and a blender pen. The stamps are from Local King Rubber, a company here in Canada. I used scraps of cardstock to back each image. Once they were assembled I placed them where I wanted them along with some Basic Grey designer paper.
Now comes the work. I used my piercing tool and pierced all around the card as well as between the panels to stitch them together. Did the same with the top panel and ran a white gel pen to connect all the little holes. The top panel is popped up on dimensionals. Added a ribbon and some dewdrops down the side and used a SU rub-on sentiment and butterfly to finish it off.
I love it when a plan comes together.
Here are the ingredients: Local King Rubber stamps, kraft cardstock, scraps of cs, Basic Grey designer paper, watercolor crayons, blender pen, ribbon, dewdrops, SU rubons, dimensionals, piercing tool, white gel pen.

Happy stamping!

Monday, May 11, 2009

National Strawberry Month

I hope all the Mothers out there had a fantastic Mother's Day and received lots of pampering by their loved ones.

I bet you didn't know that May is National Strawberry Month, well I didn't either. See all the things you learn by taking part in the challenges on Splitcoast. The LSC challenge was to make a card celebrating any special day, week, month that is held in May. You wouldn't believe how many there are. I chose the strawberries, yummy! and combined it with the WT challenge in which we had to use Kraft cardstock. So this is what I came up with.


LSC219 & WT217

The base is Kraft and was run through the Cuttlebug using a folder that for the life of me I cannot remember the name of. I cut 3 square of garden green and 3 of Kraft cardstock. The Kraft was stamped with real red and then I stamped again on another piece of cs in garden green. Cut out the leaves and stem, put them on a dimensional and attached to the strawberry. The sparkle was added by covering with diamond stickles. Each of these layers was popped up on dimensionals after the strip of designer paper from Memory Box was added. The sentiment is on garden green punched with scallop oval and topped with Kraft punched with the word punch and stamped in real red using a Flourishes sentiment. The strawberries are from Tart and Tangy from SU. I can't believe I had this ribbon which was a perfect match color wise and even has strawberries on it. I've had it for a couple of years and had never used it. Once everything was assembled I then pierced all around the card and went over it with white gel pen which makes it look like stitching.

Here is a list of items used: SU Tart & Tangy, Flourishes sentiment, oval scallop punch, work punch, Kraft and Garden Green cardstock, designer paper from Memory Box, dimensionals, diamond stickles, rhinestones, ribbon, piercing tool, white gel pen.

Just wanted to add that as a mother I feel very blessed. God has gifted me with 4 beautiful, loving daughters. What more could I ask for?

Happy stamping!

Thursday, May 7, 2009

What a Challenge!

Did you ever have one of those days when things just would not do what you wanted? Well, mine was yesterday. It started out fine and then, horror of horrors, I started to work on this card for the color challenge and sketch challenge. Sketch, no problem. Color, now that was a whole different story. I don't think I have ever struggled with colors as much as I did with this. The only thing I am happy with is the poppy. I worked for hours changing colors around, moving things, scrapping others, until I just couldn't do any more. So, what you see is what you get. I am not happy with this at all.

SC227, CC217

The base is garden green, next layer is cameo coral which was run through the cuttlebug using the tapestry folder. The horizontal panel is cameo coral with a strip of Basic Grey designer paper and a scalloped border of ballet blue. The vertical panel is cameo coral that I used my new Impressibilities on. Just lay it on top of the cardstock and then using a sponge dauber I used cameo coral ink and sponged all over it. When you lift the Impressibilities you then have this pattern. Impressibilities are great, very versatile and are from Spellbinders. Another scallop border was added to this panel. I stamped the image with stazon black on watercolor paper and colored using my aqua painter and cameo coral ink for the poppy and garden green for the stem. The poppy was stamped again, colored and cut out and popped up on dimensionals. The sentiment was stamped on cameo coral with ballet blue and punched out with the SU oval punch and layered on top of a garden green oval. Popped up on dimensionals. Added some diamond stickles to the poppy and the scalloped borders for some bling. The last step was adding the brads. The stamps are from Flourishes.

There you have my tale of woe. Now on to a better day and hopefully better cards.

God bless and Happy Stamping!

Wednesday, May 6, 2009

News Flash

Just wanted to let everyone know that Judy Rozema has blog candy to give away in celebration of her 3rd Blogaversay. Head on over to http://jarfullofjoy.blogspot.com and check out her blog. I think it is one of the best out there. You will not believe all the things she is involved in. As you may have figured out by now, I am a huge fan of hers. Best of all, she is a very nice lady!
Go check it out!!!
Happy Stamping!!

Tuesday, May 5, 2009

Spring is Here!!

Hooray! I think Spring has finally arrived. The last few days have been beautiful. Hope you had a wonderful weekend. I sure did. My family gave me a wonderful 65th Birthday with all of us getting together on Saturday for a day of fun and food. Had a BBQ for supper and enjoyed the sunshine. Of course I was spoiled with lots of goodies, mostly stamping goodies. Made my day!
This card was made for the Color challenge and Sketch challenge. Love the sketch and really like the colors.


CC216 & SC226

The base is real red run through the Cuttlebug with the Swiss Dots folder (one of my favorites). Cut out 2 strips of basic black and used the scalloped border punch on both edges. Had some of this great BoBunny 2 sided designer paper, which fit the old olive theme wonderfully. Used the two sides of the paper, one on each strip. The image was stamped with stazon black and heat set, then colored using the aqua painter and ink. I should mention that I used watercolor paper. Painted the image with real red, old olive and creamy caramel. The flower was stamped on vellum and colored with real red, then punched out with the scalloped circle punch. Punched out a white piece of cardstock and laid the vellum, colored side down on the white cs. Used a Nestibilities diecut scallop circle to cut the old olive cs which was then attached to the flower. Added glue dots to pop it up. Opal Pearl Drops were added to the scalloped edges of the black cs and a rub-on butterfly and sentiment finish it off. Ooops!, almost forgot, I used diamond stickles for the centre of the flower.

Thanks for spending some time with me. Have a wonderful day and Happy Stamping!

Tuesday, April 28, 2009

Wattle On Over

Where or where is Spring? Here it is a few days away from May and we still are getting dreary, cool, sometimes downright cold weather. Enough already! Come on Spring!

Sunday was Featured Stamper day on Splitcoast and the FS of the day was Wattle from Australia. What a gorgeous gallery she has, so many wonderful cards to pick from. I chose her card titled 'A Bit of a Disaster'. All I can say I wish my disasters looked like this.

FS116

I changed the colors, the image, the Cuttlebug folder and added a flower and dewdrops. Love this card, it is so pretty and soft. The base is pale plum. Whisper white is embossed, using the Cuttlebug and embossing folder. The scalloped ovals are die cut with Nestibilities, paper pierced, and popped up on dimensionals. The top layer of the oval is vellum which has been stamped with versamark and heat embossed with white embossing powder. This also is die cut and then layered with the stamped side facing down. The stamp I used is from Sing to the Lord, a set from Our Daily Bread Designs. Thanks to Wattle for such a beautiful inspiration.

Happy Stamping! God bless

Monday, April 27, 2009

Kleenex Boxes

Saturdays are Inspiration Challenges on Splitcoast and Steffi always comes up with the most unique inspirations. This one blew me away. I never knew there were so many different designs on Kleenex boxes. This is what inspired me http://www.kleenex.com/NA/Products/Kleenex-Tissues.aspx Kleenex Expressions,
and this is my inspiration.

IC177

The base is regal rose cardstock as well as the scalloped border. Whisper white was run through the Cuttlebug using the Tapestry folder. I then took the basic black ink pad and swiped it across the embossed paper, trying to get that black and white background like the kleenex box. I stamped Bloomin Beautiful twice and the sprig from Embrace Life. All coloring was done using Copics markers. Once the coloring was completed I then proceeded to cut out everything. I cut the flowers away from the vases, stuck the vases on the background and added dimensionals to the flowers to raise them out from the vases. Then added diamond stickles to the centers of the flowers for a little sparkle. Punched the border with SU's scallop border punch and paper pierced. I am not totally happy with the background because it came out looking kind of messy so am thinking of trying something else.

Enjoy your day and Happy Stamping!

Friday, April 24, 2009

Spring Song

Every Tuesday on Splitcoaststampers there is a color challenge and every Wednesday a sketch challenge. These challenges are a great way to learn new ways of creating cards and for me, have been a wonderful encouragement to step out of my comfort zone and try something totally out of my realm. This card "Spring Song" combines both challenges for this week.


For me, as a Christian, spring means new beginnings, new life, new opportunities to savour the beauty of God's creation. I love hummingbirds so when Stampin' Up came out with this set I just had to get it. When I look at a hummingbird, I know God is real, because only He could create such a wondrous creature.

The base is basic grey and the four panels are rose red. I used Basic Grey Sultry dp on each of the panels. The main image is stamped on whisper white with black Stazon ink. This image is actually one stamp, but I wanted the hummingbird to be out of the box so I cut them apart and cut out the hummingbird so I could pop it up on dimensionals. The coloring was done before I did any cutting. I used an aqua painter and re-inkers to color the image. The hummingbird is colored with rose red on the breast and throat, and the rest is creamy caramel with touches of garden green. The flowers are pink pirouette and old olive. There is just a touch of diamond stickles on the flowers and hummingbird. The flower square is also on dimensionals. To finish it off I added some pearl dewdrops.

Happy stamping! God bless

Wednesday, April 22, 2009

My Strength

Happy Wednesday! We've hit the middle of the week and all is well. Although, believe it or not, we had some snow today. At least you know at this time of the year it isn't going to hang around.
I was so excited Monday when my order from Our Daily Bread Designs arrived, I just had to sit down and make a card with this gorgeous set. I really appreciate how this company puts the Lord first and witnesses in such a beautiful, positive way. Way to go Kelley! Check out www.ourdailybreaddesigns.com


My Strength

This card is my witness. God truly is my strength, my refuge and ever present help. I have had 4 surgeries in the past 4 years and He has been there with me every step of the way. Thank you ODBD for designing this beautiful set.

The base to this card is SU night of navy which is topped by Basic Grey designer paper. The sentiment is stamped on a piece of the same dp in night of navy. This really is a very simple card to make. Whisper white is stamped with stazon black for the image and then I used my trusty sponge and sponged night of navy for the night sky and sponged always artichoke along the base. The light coming from the lighthouse is Shimmerz candle which is also brushed over the sentiment. The image is on night of navy cs and popped up on dimensionals, ditto for the sentiment. Added a few blue dewdrops and that is it. I wanted the image to have a darkness to it so that the light would glow through. This is such a powerful image that testifies of the power of God's love and how He cares for us through all those rough spots. His light draws us to Him and at the same time reveals the dangers that are out there. He truly is an awesome God!

I just found out this card is going to be the Card of the Week, May 6th on the Our Daily Bread blog. I am so excited and honored. I think that maybe what I tried to portray came through. Check out http://kellrick.typepad.com/our_daily_bread_designs/ on May 6th. Thanks Lorelei, you have made me very happy.

Happy stamping! God bless.

Wednesday, April 15, 2009

Easter Mouse


Oh boy, I can't believe this much time has gone by since I last posted. Been busy with Easter and family. As well, I am trying to sort out and re-arrange my craft area. I wish I could twitch my nose and it would be all done. But, that ain't goin' to happen. :)


SC223, Easter Mouse


I am such a fan of House Mouse Stamps and this one is so cute I couldn't resist it. This is such a wonderful sketch and I couldn't resist casing Roxie's card on SCS.


The base is bashful blue. The bottom panel is a piece of that gorgeous new SU textured designer paper that I then punched both sides with the SU scallop border punch. This is topped by bashful blue and then very vanilla cardstock. All were punched with the scallop border punch. The very vanilla was also scored with the Scorepal. The image is stamped on whisper white with stazon black and then colored with water color crayons and blender pen. Used a ticket punch on the image and sentiment. The sentiment is from Our Craft Lounge. Added dewdrops for the finishing touch. I liked this so much that I made three more using different colors for each one. I have 4 daughters so these were their Easter cards which can be seen at the top of this post.

Hope you had a wonderful and blessed Easter.


Friday, April 3, 2009

Frog Hoppy

Can you believe it is Friday already? I don't know where the time goes? Tomorrow we are going to see my Dad who is 86 yrs. old and just moving into a Seniors Lodge. There is so much stuff to go through and get rid of. It always amazes me at how much 'stuff' we hang on to. I know whereof I speak, I have loads of 'stuff' too. But, I do believe my DH is the original pack rat. I am sure he has stuff from when we were first married 47 years ago. He always says "you never know when you might need it and it never fails when I finally get rid of something, then is when I need it."

LSC214

Well this little guy is perfectly happy as long as he has some flies to catch. I made this card for the Limited Supplies Challenge at SCS. A 1, 2, 3 challenge, meaning we had to use one color of cardstock, 2 designer paper patterns, and 3 embellishments. This was fun and simple and I am happy with the way this card turned out. The cardstock is SU Barely Banana and the designer paper is some of that beautiful textured paper from SU. The stamp set also is SU, Hoppy For You. Here are the details: the base is barely banana, then 2 pieces of designer paper. The images were stamped on whisper white. I used garden green for the frog and sentiment, black for the flies and chocolate chip for the log and this is layered on barely banana and popped up on dimensionals. The frog and 2 of the flies were stamped twice so I could cut out one set to pop up on dimensionals. Added the ribbon, flower and dewdrops for the embellishment. There you have it, "Frog Hoppy".

I am about to hop off to bed, it will be a long tiring day tomorrow. Have a wonderful weekend and Happy Stamping!